Copyright © 2026 Cahaba Forge LLC. All rights reserved.
Cahaba Forge™ is a trademark of Cahaba Forge LLC.
Atlassian, Jira, and Forge are trademarks of Atlassian Pty Ltd.
Table of Contents
- Installation
- Licensing
- Global Configuration
- Project Configuration
- Custom Fields
- Workflow Integration
- Automation & Integration
- Configuring Segregation of Duties
- Email Notifications
- Audit Trail & Export
- Admin Audit Log
- Troubleshooting
- Getting Help
1. Installation
Business Sign-off is a Forge app distributed through the Atlassian Marketplace. Unlike Data Center plugins, there are no JAR files, certificates, or server-side installations. Atlassian hosts and runs the app entirely within the Forge platform.
Installing from Atlassian Marketplace
- Log in to your Jira Cloud instance as a Site Administrator
- Go to Settings (gear icon) > Marketplace apps
- You may be redirected to the new Connected apps page — if so, click Explore in the left sidebar
- Search for Business Sign-off & Approval for Jira
- Click Get app (or Try it free for an evaluation)
- Review the requested permissions and click Get it now
- Atlassian installs the app automatically — no restart or downtime required
Alternatively, visit the Atlassian Marketplace directly, search for the app, and click Get it now to install it on your Jira Cloud site.
Installation screenshot will be added in a future update.
Required Permissions and Scopes
During installation, Jira prompts the site administrator to authorize the following scopes:
| Scope | Purpose |
|---|---|
| Read Jira project and issue data | Read issue details, project configuration, and user information |
| Write Jira project and issue data | Update custom fields, issue properties, and approval status |
| Manage Jira configuration | Send email notifications via the Jira notify API |
| Forge Storage | Persist approval records, configuration, and audit history |
These scopes are required for the app to function. The app uses its own installed permissions (not per-user OAuth) so that all Jira users can interact with the approval panel without individual authorization prompts.
Accessing the App After Installation
Once installed, the app is available from:
- Global configuration: Settings (gear icon) > Marketplace apps > find Business Sign-off & Approval for Jira in the Connected apps list > click … (three dots) > Configure
- Project configuration: From your project board, click … (three dots) > Board settings > View space settings > Apps > Business Sign-off
- Issue panel: The sign-off panel appears automatically in the issue context sidebar for enabled projects
Note: Only Jira Site Administrators can access the global configuration page. Project Administrators can access project-level settings.
Navigation shorthand: Throughout this guide, we use “Global Config” to refer to the full path: Settings (gear icon) > Marketplace apps > Connected apps > Business Sign-off > … > Configure. We use “Project Settings” to refer to: From your project board, click … (three dots) > Board settings > View space settings > Apps > Business Sign-off.
Note: Atlassian periodically updates the Jira Cloud navigation. The exact menu labels and paths may vary slightly from what is described here.
No Server Setup Required
Business Sign-off runs entirely on Atlassian’s Forge platform. There is no need to:
- Provision or manage servers
- Install certificates or trust stores
- Configure file system paths or JVM arguments
- Manage database connections or schemas
All data is stored securely in Forge Storage within your Atlassian cloud tenant.
2. Licensing
Business Sign-off licensing is managed entirely by the Atlassian Marketplace. There are no license keys to copy, paste, or manage manually.
License States
| State | Behavior |
|---|---|
| Active | All features enabled (active paid subscription) |
| Evaluation / Trial | All features enabled during the trial period, managed by Atlassian |
| Expired | Write operations are disabled — existing data is preserved but approvers cannot be added, decisions cannot be recorded, and configuration changes are blocked |
| Community | Free license for qualifying community organizations; all features enabled |
| Academic | Free license for qualifying academic institutions; all features enabled |
| Developer | Free license for development and testing instances; all features enabled |
| Demo | Short-term license for demonstrations; all features enabled |
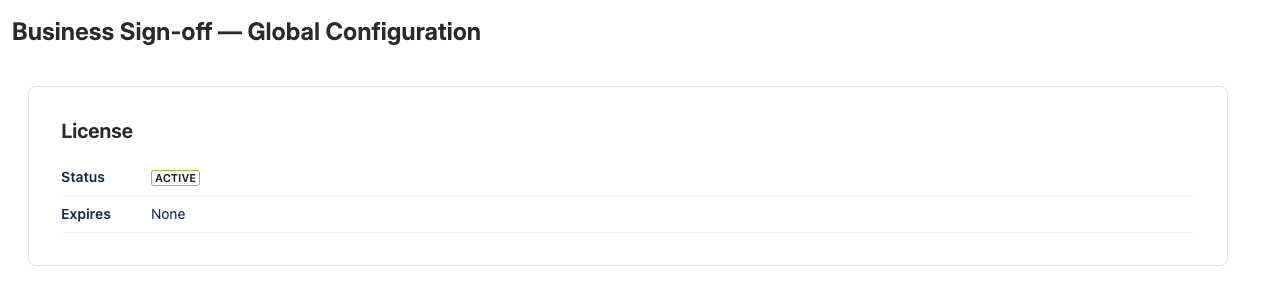
License Status Display
The global administration page displays the current license status in the header area. The status indicator shows:
- The license type and state
- The number of licensed users
- The subscription expiry date (if applicable)
Trial Period
When you install the app for the first time, Atlassian automatically starts a free trial period. The trial duration is determined by Atlassian Marketplace policies (typically 30 days). During the trial, all features are fully functional with no restrictions.
What Happens When a License Expires
When the license expires or is removed:
- Read operations continue — existing approval data remains visible on issues, and audit history is accessible
- Write operations are disabled — no new approvers can be added, no decisions can be recorded, and configuration changes are blocked
- Workflow functions fail open — conditions and validators do not block transitions when the license is inactive, preventing workflow deadlocks
- Data is preserved — all approval records, configuration, and audit history remain intact and are restored when a valid license is reactivated
Tip: To renew or manage your subscription, visit the Manage subscriptions page in your Atlassian administration at admin.atlassian.com.
3. Global Configuration
Access the global configuration page from Global Config. The configuration page opens to the Settings tab.
Only Jira Site Administrators can access this page.
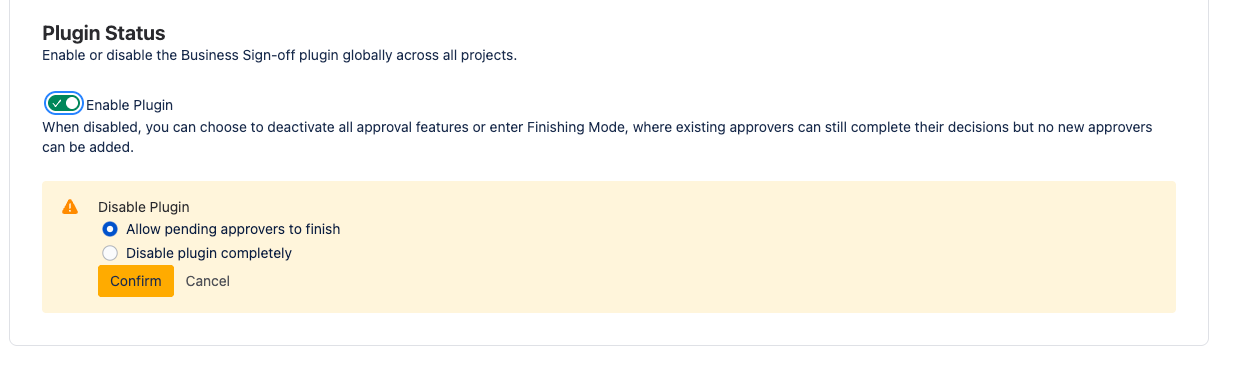
3.1 Plugin Enable/Disable
Toggle the Enable Plugin switch to activate or deactivate Business Sign-off across all projects.
When disabled:
- All approval operations are blocked
- Issue panels are hidden
- Workflow conditions and validators fail open (do not block transitions)
- Existing data is preserved (non-destructive)
Disable dialog: When turning the plugin off, a confirmation dialog presents two options:
- Full Disable — immediately disables the plugin. All pending approvals are frozen in their current state. No new approvers can be added, and no decisions can be recorded.
- Finishing Mode — the plugin enters a transitional state where existing approvers can still complete their decisions, but no new approvers can be added to any issue. Once all pending approvals are resolved (or manually cleared), the plugin fully disables.
Finishing Mode is useful when you need to decommission the plugin gracefully without disrupting in-flight approvals.
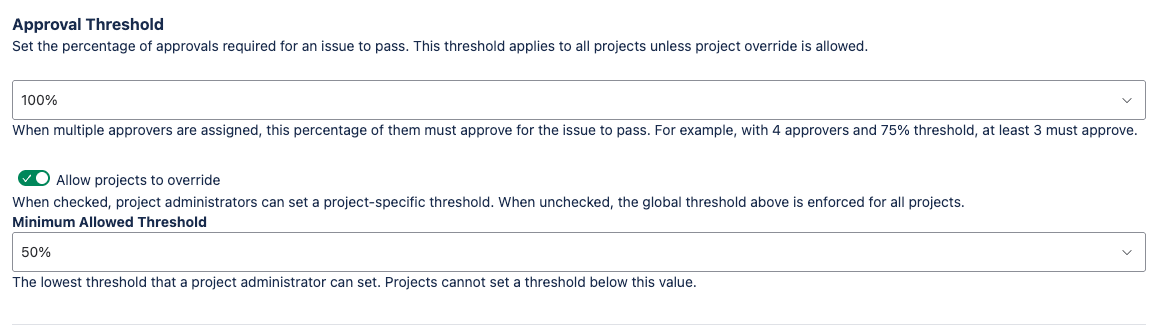
3.2 Approval Threshold
Set the global default percentage of approvals required for an issue to pass:
| Threshold | Meaning | Example (4 approvers) |
|---|---|---|
| 50% | Simple majority | 2 must approve |
| 66% | Two-thirds majority | 3 must approve |
| 75% | Three-quarters majority | 3 must approve |
| 90% | Near-unanimous | 4 must approve |
| 100% | Unanimous | All 4 must approve |
The threshold is applied using ceiling rounding — for example, 75% of 3 approvers rounds up to 3 (all must approve).
Allow Project Threshold Override: When enabled, project administrators can set a different threshold for their project, subject to the minimum threshold floor.
Minimum Threshold: Sets the lowest threshold a project can configure. This prevents project administrators from setting an inappropriately low bar for approval. The minimum threshold must be less than or equal to the global threshold.
Note: If you change the minimum threshold to a value higher than a project’s current override, the project’s effective threshold is raised to the new minimum on the next evaluation.
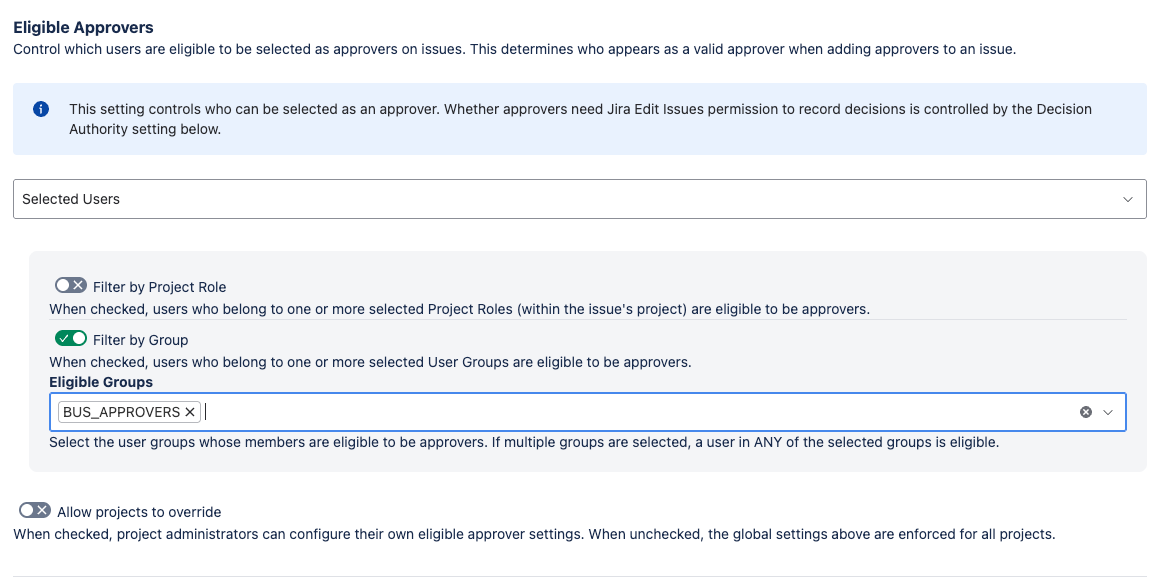
3.3 Eligible Approver Controls
Restrict who can serve as an approver across the instance.
Mode selection:
- All Jira users — any Jira user can be added as an approver (subject to Decision Authority and SoD rules)
- Selected users only — only users matching the configured filters can be approvers
Filters (available when “Selected users only” is chosen):
- Filter by Project Roles — toggle on, then select one or more project roles from the multi-select dropdown. Users in any of the selected roles for the issue’s project are eligible.
- Filter by User Groups — toggle on, then select one or more Jira groups from the multi-select dropdown. Users in any of the selected groups are eligible.
Filters use OR logic: a user is eligible if they match any selected role or any selected group. At least one filter must be enabled with at least one value selected.
Allow Project Eligible Approver Override: When enabled, project administrators can configure different eligible approver filters for their project.
Tip: If you select a project role that has no members in a particular project, no users from that role will be eligible in that project. Verify that selected roles are populated in the projects where you need them.
3.4 Decision Authority
The Require Edit Permission to Decide toggle controls the permission level required for an approver to record a decision (approve or return).
- ON: Approvers must have the Edit Issues permission on the project to record their decision. This is the more restrictive setting and is appropriate when all approvers are active project contributors.
- OFF: Approvers only need Browse Projects permission to record their decision. This is useful for read-only stakeholders, external reviewers, or users who need to approve work without having full edit access to the project.
Allow Project Decision Authority Override: When enabled, project administrators can set a different decision authority requirement for their project.
Note: Decision Authority controls who can decide (approve or return). It does not control who can be added as an approver — that is governed by Eligible Approver Controls and Approver Management Permissions.
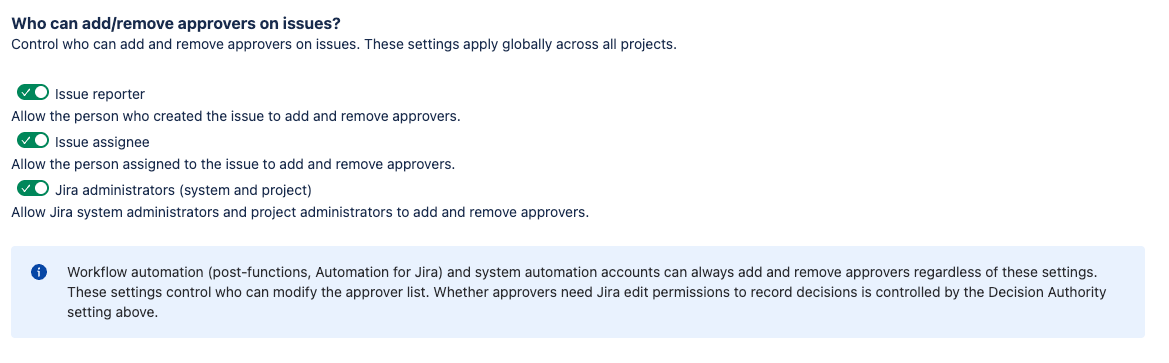
3.5 Approver Management Permissions
Configure who can add and remove approvers from the issue panel. Three toggles control this:
- Allow Reporter — the person who created the issue can add and remove approvers
- Allow Assignee — the person assigned to the issue can add and remove approvers
- Allow Administrators — Jira site administrators and project administrators can add and remove approvers
At least one of these toggles must be enabled. The app enforces this requirement and will not allow you to disable all three.
Note: Workflow post-functions can add and remove approvers regardless of these settings. Post-functions run as the app (not as a user), so they bypass management permission checks.
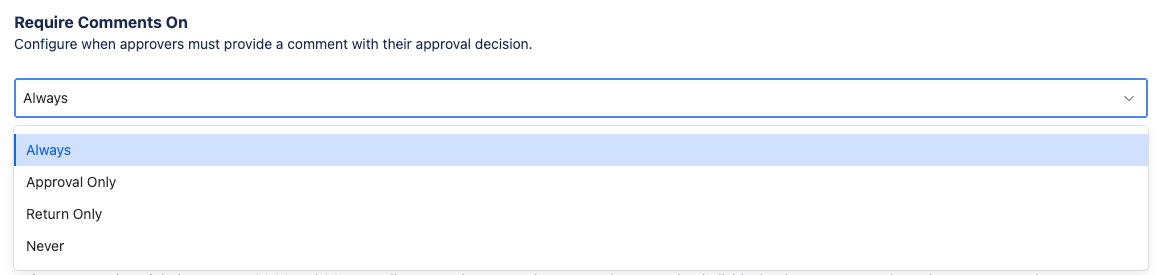
3.6 Comment Requirements
Configure when approvers must provide a comment with their decision:
| Option | Behavior |
|---|---|
| All decisions | Comment required for both approvals and returns |
| Approval only | Comment required only when approving |
| Return only | Comment required only when returning |
| None | Comments are always optional |
When a comment is required, the approver must enter text before submitting their decision. The decision button is disabled until a comment is provided.
Allow Project Comment Override: When enabled, project administrators can set different comment requirements for their project.
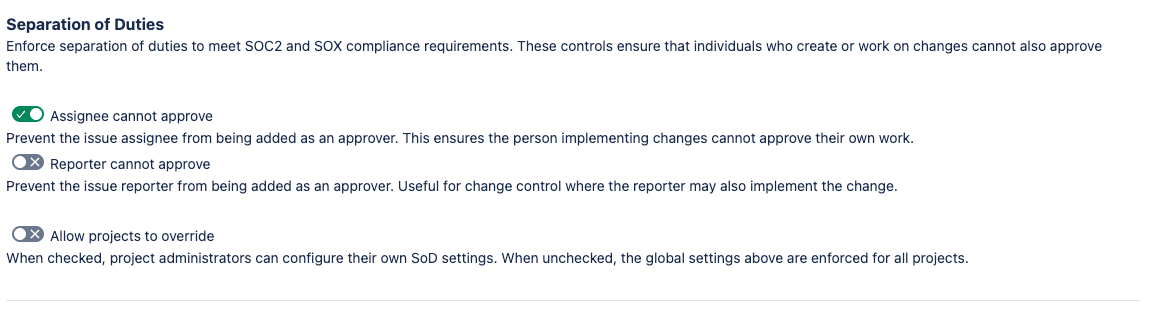
3.7 Separation of Duties (SoD)
Configure which issue participants cannot serve as approvers:
- Assignee Cannot Approve — when enabled, the person assigned to work on the issue cannot approve or return it
- Reporter Cannot Approve — when enabled, the person who created the issue cannot approve or return it
How violations are enforced:
When a SoD rule is active, the plugin enforces it at every decision point:
- An approver who violates SoD is marked as ineligible in the issue panel. Their status shows as “Ineligible” with a tooltip explaining the reason.
- Ineligible approvers cannot record a decision — the approve and return buttons are hidden for them.
- If an approver has already recorded a decision and the assignee or reporter later changes to match them, the plugin re-evaluates SoD in real time. The approver’s existing decision is preserved but flagged, and they cannot change or revoke it while the violation is active.
- SoD enforcement is logged in the audit trail.
Allow Project SoD Override: When enabled, project administrators can set different SoD rules for their project.
Tip: For compliance frameworks like SOC 2 or SOX, enable both SoD toggles globally and do not allow project overrides. This ensures consistent enforcement across all projects.
3.8 Decision Locking
The Decision Locking Enabled toggle controls whether approved decisions become immutable after the issue transitions to a different workflow status.
How it works:
- When an approver records a decision, the plugin captures the issue’s current workflow status.
- If the issue later transitions to a different status, any APPROVED decisions from the previous status become locked.
- Locked approvers see a lock icon next to their status in the issue panel. The “Change Decision” button is hidden, and a tooltip explains that the decision is locked because the issue has moved to a different status.
- If the issue returns to the original status where the approval was recorded, the lock is released and the approver can change their decision.
Important details:
- Only APPROVED decisions are locked. RETURNED (rejected) decisions are never locked, regardless of status transitions. This allows approvers who returned an issue to change their mind if the issue is reworked and re-submitted.
- The Reset Approval Status post-function respects decision locking — it skips locked approvals and only resets unlocked decisions. Use the Selective Reset post-function with appropriate filters to target specific approvers.
- Approvals recorded before decision locking was enabled are treated as unlocked, since no status snapshot exists for them.
Allow Project Decision Lock Override: When enabled, project administrators can enable or disable decision locking for their project.

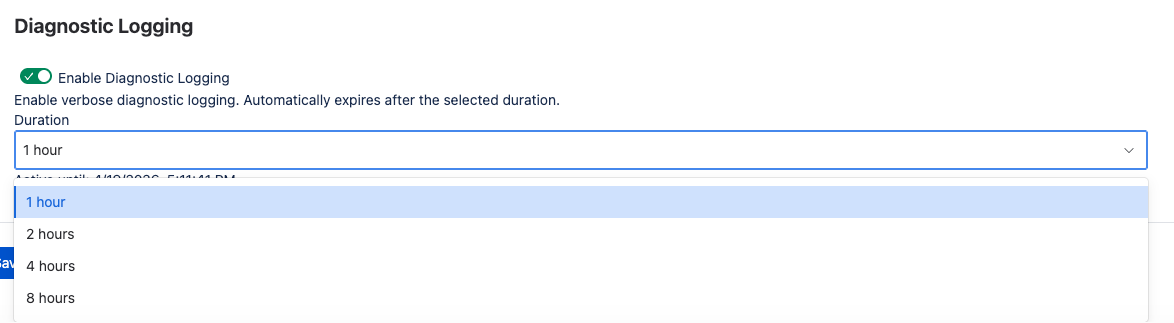
3.9 Diagnostic Logging
Toggle diagnostic logging on or off for troubleshooting. When enabled, the app writes detailed log entries for all operations including resolver calls, service actions, eligibility checks, and workflow function execution.
Duration dropdown: Select how long logging remains active:
| Duration | Use case |
|---|---|
| 1 hour | Quick investigation of a specific issue |
| 2 hours | Reproducing an intermittent problem |
| 4 hours | Monitoring a workflow during a release cycle |
| 8 hours | Extended troubleshooting session |
Logging automatically expires after the configured duration. There is no need to remember to turn it off — the app disables logging when the timer expires.
Viewing logs: Diagnostic logs are accessible through the Atlassian Developer Console at developer.atlassian.com. Navigate to your app’s environment and view the runtime logs.
Privacy: Log entries include Atlassian account IDs and issue keys for correlation, but do not contain personally identifiable information (PII) such as display names or email addresses.
Tip: When contacting Cahaba Forge support, enable diagnostic logging and reproduce the issue before submitting your support request. Include the approximate timestamp of the reproduction so support can locate the relevant log entries.
4. Project Configuration
Access project-level settings from Project Settings.
Only Project Administrators can access project configuration. The global plugin must be enabled for project settings to take effect.
4.1 Enable for Project
Toggle Business Sign-off on or off for the project. When disabled:
- The issue panel is hidden for all issues in the project
- No new approvers can be added
- Existing approver data is preserved
The project toggle requires the global plugin to be enabled. If the global plugin is disabled, the project toggle has no effect.
Finishing Mode: When disabling a project, a confirmation dialog presents the same two options as the global disable:
- Full Disable — immediately disables the plugin for the project
- Finishing Mode — existing approvers can complete their decisions, but no new approvers can be added. The project fully disables once all pending approvals are resolved.
4.2 Panel Visibility
Choose which issue types display the Business Sign-off panel:
- All standard issue types — the panel appears on every standard issue type in the project. Subtask types are excluded by default.
- Selected issue types — the panel appears only on the issue types you select from the multi-select dropdown. The dropdown lists all issue types configured for the project.
Note: If an issue type is removed from the project after being selected here, the panel will no longer appear on issues of that type. The configuration is automatically cleaned up on the next settings save.
4.3 Approval Required
The Approval Required toggle controls whether workflow validators enforce approval for this project.
- ON: Workflow validators (Require Approvers, Require Approval Passed, Require Group/Role Approval) actively block transitions when their conditions are not met.
- OFF: Workflow validators pass automatically when no approvers are assigned to the issue. If approvers are assigned, the validators still enforce their conditions. This allows projects to use the approval panel for optional sign-offs without blocking workflows.
Tip: Set Approval Required to OFF for projects that want the approval panel available but do not need strict workflow enforcement. Approvers can still be added and decisions recorded — the difference is that transitions are not blocked when no approvers are present.
4.4 Threshold Override
This section is only visible if the global administrator has enabled Allow Project Threshold Override.
- Use Global Setting — the project inherits the global threshold (displayed for reference)
- Override — select a project-specific threshold from the dropdown
The override value must meet or exceed the Minimum Threshold configured globally. If the global minimum is 66%, the project cannot set a threshold below 66%.
4.5 Eligible Approver Override
This section is only visible if the global administrator has enabled Allow Project Eligible Approver Override.
- Use Global Setting — the project inherits the global eligible approver mode and filters
- Override — configure project-specific eligibility rules with the same options available globally (mode selection, role filters, group filters)
Project-level role filters apply to roles defined in the current project. If the project does not have a role that is selected in the filter, no users from that role will be eligible.
4.6 Decision Authority Override
This section is only visible if the global administrator has enabled Allow Project Decision Authority Override.
- Use Global Setting — the project inherits the global decision authority requirement
- Override — toggle the Require Edit Permission to Decide setting independently for this project
4.7 Comment Requirement Override
This section is only visible if the global administrator has enabled Allow Project Comment Override.
- Use Global Setting — the project inherits the global comment requirement
- Override — select a project-specific comment requirement from the dropdown (All decisions, Approval only, Return only, None)
4.8 SoD Override
This section is only visible if the global administrator has enabled Allow Project SoD Override.
- Use Global Setting — the project inherits the global SoD rules
- Override — toggle Assignee Cannot Approve and Reporter Cannot Approve independently for this project
Note: Relaxing SoD rules at the project level (e.g., disabling “Assignee Cannot Approve” when it is enabled globally) may weaken compliance controls. Consider your organization’s audit requirements before overriding SoD rules.
4.9 Decision Locking Override
This section is only visible if the global administrator has enabled Allow Project Decision Lock Override.
- Use Global Setting — the project inherits the global decision locking setting
- Override — enable or disable decision locking independently for this project
4.10 Email Notifications
Email notification preferences are configured at the project level. Each notification type can be toggled or configured independently:
Notify Approvers on Add
Toggle on or off. When enabled, each approver receives an email notification when they are added to an issue. The email includes a direct link to the issue.
Notify Requestor on Decision
Select when to notify the person who requested the approval (the user who added the approver) about individual decisions:
| Option | Behavior |
|---|---|
| Approved only | Notify when an approver approves |
| Returned only | Notify when an approver returns |
| Both | Notify on every decision |
| Never | No notifications for individual decisions |
Notify Requestor on Outcome
Select when to notify the requestor about the overall approval outcome (passed or failed):
| Option | Behavior |
|---|---|
| Approved only | Notify when the issue reaches Approval Passed |
| Returned only | Notify when the issue reaches Approval Failed |
| Both | Notify on either outcome |
| Never | No outcome notifications |
Notify Assignee on Decision
Same options as Notify Requestor on Decision, but sent to the current issue assignee.
Notify Assignee on Outcome
Same options as Notify Requestor on Outcome, but sent to the current issue assignee.
Tip: For high-volume projects, consider setting decision notifications to “Never” and using only outcome notifications. This reduces email noise while still ensuring stakeholders are informed when the final result is reached.
5. Custom Fields
Business Sign-off creates two custom fields and uses Jira issue properties for JQL indexing and audit trail persistence.
5.1 BSO - Approvers
A multi-user custom field that displays the current list of approvers assigned to an issue.
Key characteristics:
- Type: User (collection: list)
- Read-only: The field cannot be edited directly (issue edit screen, bulk edit, or REST API). Approvers are managed exclusively through the Business Sign-off issue panel and workflow post-functions.
- Sync: One-way (storage → field). When an approver is added or removed through the issue panel or a post-function, the field is automatically updated to mirror the current approver list. This keeps the field available for JQL, list columns, and board cards.
- JQL: Searchable using standard user field syntax:
"BSO - Approvers" = currentUser()— find issues where you are an approver"BSO - Approvers" = "john.smith"— find issues where a specific user is an approver"BSO - Approvers" IS NOT EMPTY— find issues with any approvers assigned
5.2 BSO - Status
A read-only text field that displays the current approval status of the issue.
Possible values:
| Status | Meaning |
|---|---|
| Not Started | Approvers are assigned but none have decided yet |
| Awaiting Decisions | At least one approver has decided but the threshold is not yet met |
| Approval Passed | The approval threshold has been met |
| Approval Failed | Enough approvers have returned to make passing the threshold impossible |
Key characteristics:
- Type: String (read-only)
- JQL: Searchable using standard text field syntax:
"BSO - Status" = "Approval Passed"— find approved issues"BSO - Status" = "Approval Failed"— find returned issues"BSO - Status" IS EMPTY— find issues with no approval activity
- Updated automatically: The status field is recalculated and updated whenever an approver records a decision, is added, or is removed.
5.3 Issue Properties
Business Sign-off writes a bso-signoff issue property to each issue with approvers. This property is used by workflow conditions (Jira Expressions) and is available for JQL queries using the issue.property syntax.
Property contents:
| Field | Type | Description |
|---|---|---|
pluginActive | boolean | Whether the plugin is active for this issue’s project |
approvalRequired | boolean | Whether approval is required for workflow enforcement |
totalApprovers | number | Total number of assigned approvers |
approvedCount | number | Number of approvers who have approved |
returnedCount | number | Number of approvers who have returned |
pendingCount | number | Number of approvers who have not yet decided |
approvedPercentage | number | Percentage of approvers who have approved |
status | string | Aggregate status: NOT_STARTED, AWAITING_DECISIONS, APPROVAL_PASSED, or APPROVAL_FAILED |
Privacy: The bso-signoff property contains only aggregate statistics. It does not include account IDs, display names, or any personal data.
5.4 Immutable Audit Trail Properties
For compliance and tamper detection, Business Sign-off writes individual audit records as Jira issue properties using the key pattern bso.approval.audit.NNNN (where NNNN is a sequential number).
Key characteristics:
- Compliance events recorded: Decisions (approve, return, revoke), approver additions and removals, status resets, and outcome changes
- SHA-256 hash chain: Each audit record includes a SHA-256 hash computed from the record’s key fields and the hash of the previous record. This creates a tamper-evident chain — any modification to a historical record breaks the chain.
- Persistence after uninstall: Issue properties are native Jira data. If the app is uninstalled, these audit records remain on the issues and can be read via the Jira REST API or re-ingested by the app if reinstalled.
- No duplication: Audit trail properties complement (not replace) the Forge Storage audit history. The issue properties serve as an immutable backup that survives app uninstallation.
Note: Issue properties have a size limit. The app manages property rotation automatically, creating new numbered properties as needed.
6. Workflow Integration
Business Sign-off provides workflow conditions, validators, and post-functions that integrate with Jira’s workflow engine. These components allow you to enforce approval requirements at transition points and automate approver management.
All workflow components support both company-managed and team-managed projects.
6.1 Workflow Conditions
Conditions control whether a transition is visible to the user. If a condition is not met, the transition button does not appear. Business Sign-off provides three conditions:
Issue Has Approvers
Shows the transition only when at least one approver is assigned to the issue.
- Use case: Gate a “Submit for Review” transition so it only appears after approvers have been added.
- Expression-based: This condition is evaluated by Jira using a Jira Expression against the
bso-signoffissue property. No function call is made to the app. - Fail-open behavior: If the
bso-signoffproperty does not exist (no approvers have ever been assigned), if the plugin is inactive for the project, or if approval is not required, the condition passes and the transition is visible.
Issue Is Approved
Shows the transition only when the approval status is Approval Passed (the approval threshold has been met).
- Use case: Gate a “Deploy to Production” transition so it only appears after the issue has been approved.
- Expression-based: Evaluated by Jira against the
bso-signoffissue property. - Fail-open behavior: If the property does not exist, if the plugin is inactive, or if approval is not required and no approvers are assigned, the condition passes.
Issue Is Returned
Shows the transition only when the approval status is Approval Failed.
- Use case: Show a “Rework” or “Send Back” transition only when the issue has been returned by approvers.
- Expression-based: Evaluated by Jira against the
bso-signoffissue property. - Fail-closed behavior: Unlike the other two conditions, this condition is fail-closed — if the property does not exist or the plugin is inactive, the condition fails and the transition is hidden. This prevents the “return” path from appearing when there is no active approval process.
Note: Because conditions are expression-based, they are evaluated entirely by Jira with no latency overhead from the app. They read directly from the issue property that Business Sign-off maintains.
6.2 Workflow Validators
Validators control whether a transition is allowed to proceed. If a validator fails, the transition is blocked and an error message is displayed. Business Sign-off provides three validators:
Require Approvers
Blocks the transition unless at least one eligible approver is assigned to the issue.
- Use case: Ensure that issues cannot advance past a review stage without having approvers assigned.
- Behavior when Approval Required is OFF: If the project’s Approval Required setting is OFF and no approvers are assigned, the validator passes. If approvers are assigned, the validator enforces normally.
Require Approval Passed
Blocks the transition unless the approval status is Approval Passed.
- Use case: Prevent issues from moving to a “Done” or “Deployed” status without meeting the approval threshold.
- Behavior when Approval Required is OFF: Same as above — passes when no approvers are assigned and approval is not required.
Require Group/Role Approval
Blocks the transition unless approvers from specific groups and/or roles have approved. This validator has a configuration UI that appears in the workflow editor.
Configuration options:
- Rule logic: Choose AND (all rules must be satisfied) or OR (at least one rule must be satisfied)
- Rules: Add one or more rules, each specifying:
- Source type: Project role or user group
- Source value: The specific role or group
- Minimum count: Minimum number of approvers from this source that must be assigned (default: 1)
- Minimum approved: Minimum number of approvers from this source that must have approved (optional; defaults to the minimum count)
Example: To require approval from at least one member of the “QA” role and at least one member of the “Security” group, add two rules with AND logic:
| Rule | Source type | Source value | Min count | Min approved |
|---|---|---|---|---|
| 1 | Project Role | QA | 1 | 1 |
| 2 | User Group | security-reviewers | 1 | 1 |

6.3 Workflow Post-Functions
Post-functions execute after a transition completes. They automate approver management and notification tasks. Business Sign-off provides six post-functions:
Add Approvers
Automatically adds approvers to the issue when the transition fires.
Source types:
| Source | Description |
|---|---|
| Specific users | Add named users by account ID |
| Project role | Add all members of a selected project role |
| User group | Add all members of a selected user group |
| User picker custom field | Add the user(s) from a specified user picker field on the issue |
The configuration UI allows you to select the source type and configure the specific source. All eligibility rules (eligible approver filters, SoD) are applied when the post-function executes — ineligible users are skipped.
Remove Approvers
Removes approvers from the issue when the transition fires.
Modes:
| Mode | Description |
|---|---|
| Remove all | Remove all approvers from the issue |
| Pending only | Remove only approvers who have not yet decided (preserves decided approvers) |
| Specific users | Remove named users by account ID |
The configuration UI allows you to select the removal mode and, for specific users, configure which users to remove.
Notify Approvers
Sends email notifications to approvers who have not yet decided.
Modes:
| Mode | Description |
|---|---|
| All undecided | Notify all approvers who have not yet approved or returned |
| New only (ADDED) | Notify only approvers in the ADDED status (recently added, not yet notified) |
| Pending only | Notify only approvers in the PENDING status (previously notified but not yet decided) |
Reset Approval Status
Resets all decisions back to PENDING, allowing the approval cycle to start over.
- Notify after reset: Optional toggle — when enabled, sends a notification to all approvers after their decisions are reset.
- Respects decision locking: If decision locking is enabled, locked approvals are skipped by the reset. Only unlocked decisions are reset. Use the Selective Reset post-function to target specific approvers if needed.
Use case: Add this post-function to a “Rework” or “Reopen” transition so that when an issue is sent back for changes, all approvals are cleared and the approval cycle restarts.
Selective Notify
Sends notifications to approvers matching specific role and/or group filters. This is a targeted version of the Notify Approvers post-function.
Configuration:
- Filter by Roles — toggle on and select one or more project roles. Only undecided approvers who are members of a selected role are notified.
- Filter by Groups — toggle on and select one or more user groups. Only undecided approvers who are members of a selected group are notified.
- Filters use OR logic: an approver is notified if they match any selected role or any selected group.
- Notify mode: Same options as the standard Notify Approvers post-function (all undecided, new only, pending only).
Use case: Notify only the QA team’s approvers when the issue transitions to “QA Review”, without bothering approvers from other teams.
Selective Reset
Resets decisions for approvers matching specific role and/or group filters. This is a targeted version of the Reset Approval Status post-function.
Configuration:
- Filter by Roles — toggle on and select one or more project roles. Only matching approvers have their decisions reset.
- Filter by Groups — toggle on and select one or more user groups. Only matching approvers have their decisions reset.
- Filters use OR logic: an approver is reset if they match any selected role or any selected group.
- Notify after reset: Optional toggle — when enabled, sends a notification to the affected approvers after their decisions are reset.
Use case: When an issue moves from “Dev Review” to “QA Review”, reset only the QA approvers’ decisions (from a previous cycle) while preserving the dev team’s existing approvals.

6.4 Setting Up a Basic Approval Workflow
Follow these steps to configure a simple approval gate in your project’s workflow.
Step 1: Enable the Plugin
- Go to Global Config (see Section 1 for navigation)
- Toggle Enable Plugin to ON
- Configure your preferred threshold, SoD rules, and other global defaults
Step 2: Enable for Your Project
- Go to Project Settings
- Toggle Enable to ON
- Set Approval Required to ON
- Configure panel visibility and any project overrides
Step 3: Edit Your Workflow
- Go to Project Settings > Workflows (or Jira Settings > Workflows for shared workflows)
- Click Edit on the workflow you want to modify
- Select the transition that should require approval (e.g., “In Review” to “Done”)
Step 4: Add a Validator
- On the selected transition, open the Rules panel
- Under Validators, click Add validator
- Select Require Approval Passed (Business Sign-off)
- Save the validator
This blocks the transition until the approval threshold is met.
Step 5: Add a Post-Function (Optional)
- On an earlier transition (e.g., “To Do” to “In Review”), open the Rules panel
- Under Post-functions, click Add post-function
- Select Notify Approvers (Business Sign-off)
- Configure the notification mode (e.g., “All undecided”)
- Save the post-function
This sends a notification to all undecided approvers when the issue enters the review stage.
Step 6: Publish the Workflow
- Click Publish to activate the workflow changes
- Jira may prompt you to save a backup — this is recommended
Step 7: Test
- Create or open an issue in the project
- Add one or more approvers from the issue panel
- Verify that the gated transition is not available until the threshold is met
- Have the approvers approve the issue
- Verify that the transition becomes available
Tip: Start with a simple setup (one validator on one transition) and expand from there. You can add conditions to hide transitions until approval is possible, and post-functions to automate approver assignment and notification.
7. Automation & Integration
Business Sign-off provides multiple integration points that allow administrators to build automated approval workflows tailored to their environment. This section brings together the workflow functions, custom fields, Jira Automation, JQL, and issue properties into a unified reference for designing end-to-end approval processes.
7.1 Workflow-Driven Automation
Workflow functions are the primary mechanism for automating approvals. By combining post-functions, validators, and conditions on your Jira workflow transitions, you can build fully automated approval gates without any manual intervention beyond the actual approval decision.
Available building blocks:
| Function Type | Functions | Purpose |
|---|---|---|
| Conditions (3) | Has Approvers, Is Approved, Is Returned | Control which transitions are visible based on approval state |
| Validators (3) | Require Approvers, Require Approval Passed, Require Group/Role Approval | Block transitions that don’t meet approval requirements |
| Post-Functions (6) | Add Approvers, Remove Approvers, Notify Approvers, Reset Approval Status, Selective Notify, Selective Reset | Automate approver assignment, notifications, and resets on transitions |
Note: See Section 6 for detailed configuration of each workflow function.
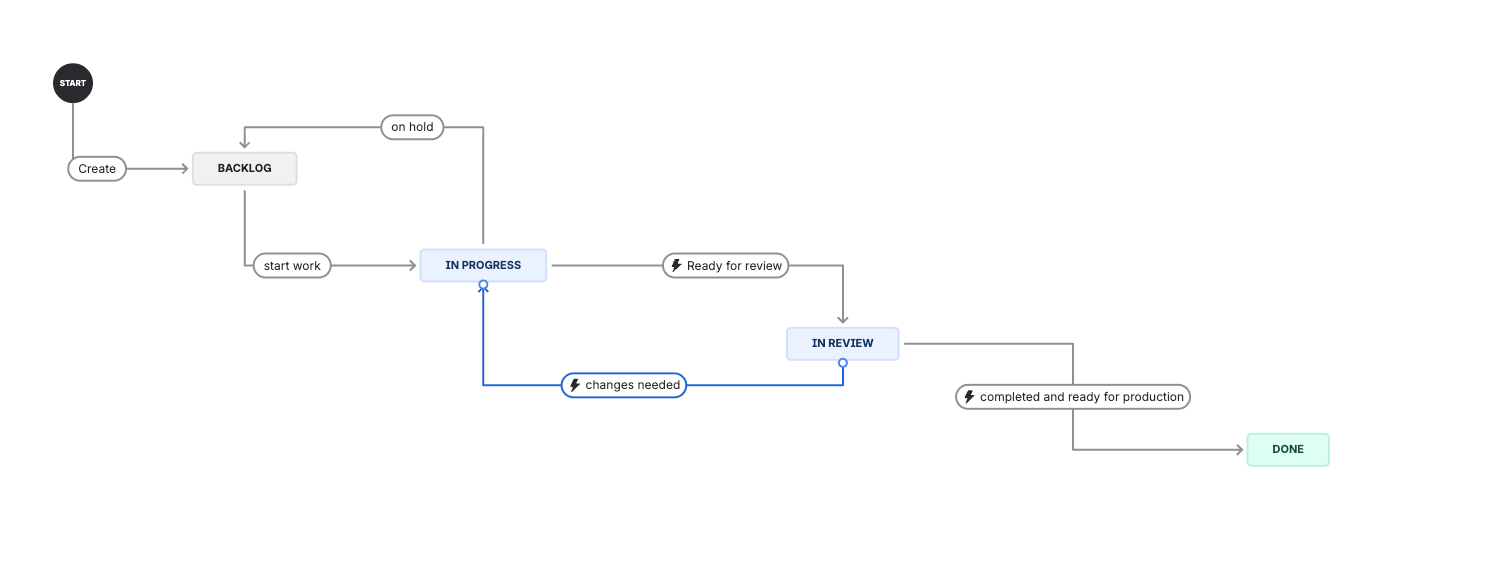
Design pattern — Automated approval gate:
A common pattern combines post-functions on an early transition with validators on a later transition:
- “Start Review” transition (e.g., In Progress → In Review):
- Post-function: Add Approvers (from a project role, e.g., “Reviewers”)
- Post-function: Notify Approvers (all undecided)
- This automatically assigns and notifies the right people when work moves to review
- “Approve for Release” transition (e.g., In Review → Ready for Release):
- Condition: Issue Is Approved (hides the transition until approval passes)
- Validator: Require Approval Passed (blocks the transition if approval hasn’t passed)
- This ensures no issue can advance without sign-off
- “Return to Development” transition (e.g., In Review → In Progress):
- Post-function: Reset Approval Status (with notify = true)
- This resets all decisions and re-notifies approvers when work is sent back
Design pattern — Multi-stage approval:
For workflows requiring approvals at multiple stages (e.g., technical review, then management sign-off):
- “Submit for Technical Review” transition:
- Post-function: Add Approvers from “Technical Reviewers” role
- Post-function: Notify Approvers
- “Submit for Management Approval” transition:
- Validator: Require Group/Role Approval (rule: “Technical Reviewers” role, minimum 2 approved)
- Post-function: Add Approvers from “Management” group
- Post-function: Notify Approvers
- “Approve for Production” transition:
- Validator: Require Group/Role Approval (rule: “Management” group, minimum 1 approved)
- “Return to Development” transition (from any review stage):
- Post-function: Selective Reset (filter by the current stage’s role/group)
- This resets only the current stage’s approvals, preserving earlier stage decisions
7.2 Custom Field Integration
Business Sign-off creates two custom fields that integrate with Jira’s native functionality:
BSO - Approvers (multi-user field, read-only):
- Appears on issue views, board cards (if configured), and issue lists
- Displays the current approver list, kept in sync automatically from the issue panel (read-only — not directly editable)
- Can be added to Jira dashboards as a column in filter results
- Can be used in board card layout to show approvers directly on Kanban/Scrum boards
BSO - Status (read-only text field):
- Displays the current approval status: Not Started, Awaiting Decisions, Approval Passed, Approval Failed
- Can be added as a column in issue lists and dashboards
- Updated automatically — no manual intervention needed
Tip: Add both BSO fields to your team’s default issue list columns. This gives everyone visibility into approval status without opening each issue individually.
7.3 Jira Automation Rules
Jira’s built-in Automation for Jira can interact with Business Sign-off through the custom fields. Automation rules cannot call resolvers directly, and they cannot write to the BSO - Approvers field (it is read-only). They can, however, read the BSO fields in conditions and act on approval status.
What automation can do:
- Read BSO - Status in conditions — e.g., “If BSO - Status equals Approval Passed, then transition the issue”
- Read BSO - Approvers in conditions — e.g., “If BSO - Approvers is not empty, then…”
- Use BSO fields in notifications — include approval status in automated Jira notification templates
Example automation rules:
| Rule | Trigger | Condition | Action |
|---|---|---|---|
| Auto-transition on approval | Field value changed: BSO - Status | BSO - Status = “Approval Passed” | Transition issue to “Approved” status |
| Notify manager on return | Field value changed: BSO - Status | BSO - Status = “Approval Failed” | Send email to issue reporter |
| Escalate stale approvals | Scheduled (daily) | BSO - Status = “Awaiting Decisions” AND updated < -7d | Send email notification to approvers |
Note: The BSO - Approvers field is read-only — automation rules cannot add or remove approvers by editing it. Approvers are managed through the Business Sign-off issue panel and workflow post-functions. Automation can read the BSO fields and act on approval status, but not write the approver list.
7.4 JQL Queries & Dashboards
Business Sign-off’s custom fields and issue properties enable powerful JQL queries for dashboards, filters, and reporting.
Custom field JQL examples:
-- Find all issues where I am an approver
"BSO - Approvers" = currentUser()

-- Find all issues approved in a project
"BSO - Status" = "Approval Passed" AND project = PROJ

-- Find issues awaiting approval decisions
"BSO - Status" = "Awaiting Decisions" AND project = PROJ

-- Find issues that failed approval
"BSO - Status" = "Approval Failed"

-- Find issues where a specific user is an approver
"BSO - Approvers" = "john.smith@company.com"

-- Find issues with no approvers assigned
"BSO - Status" = "Not Started" OR "BSO - Approvers" is EMPTY
Issue property JQL examples:
The bso-signoff issue property enables queries on approval metadata:
-- Find issues where approval is required but not yet passed
issue.property[bso-signoff].approvalRequired = true
  AND issue.property[bso-signoff].status != "APPROVAL_PASSED"

-- Find issues with 100% approval
issue.property[bso-signoff].percentage = 100

-- Find issues where plugin is active
issue.property[bso-signoff].pluginActive = true
Dashboard ideas:
| Dashboard Gadget | JQL Filter | Purpose |
|---|---|---|
| My Pending Approvals | "BSO - Approvers" = currentUser() AND "BSO - Status" = "Awaiting Decisions" | Personal approver inbox |
| Approval Bottlenecks | "BSO - Status" = "Awaiting Decisions" AND updated < -3d | Stale approvals needing attention |
| Recently Approved | "BSO - Status" = "Approval Passed" AND updated >= -7d AND project = PROJ | Weekly approval throughput |
| Failed Approvals | "BSO - Status" = "Approval Failed" AND project = PROJ | Issues returned by approvers |
7.5 Issue Properties for Advanced Integrations
For teams building custom integrations or using third-party tools, Business Sign-off writes structured data to Jira issue properties that can be read via the Jira REST API.
bso-signoff property (approval statistics):
{
  "status": "AWAITING_DECISIONS",
  "approvedCount": 2,
  "returnedCount": 0,
  "pendingCount": 1,
  "totalApprovers": 3,
  "percentage": 67,
  "threshold": 75,
  "approvalRequired": true,
  "pluginActive": true,
  "lastUpdated": "2026-04-12T14:30:00.000Z"
}
Access via REST API:
GET /rest/api/3/issue/{issueKey}/properties/bso-signoffThis property contains no personal data — only aggregate statistics. It is updated every time an approver is added, removed, or records a decision.
bso.approval.audit.NNNN properties (immutable audit trail):
Individual compliance events with full context and hash chain integrity. See Section 10.3 for details.
Access via REST API:
GET /rest/api/3/issue/{issueKey}/properties/bso.approval.audit.index
GET /rest/api/3/issue/{issueKey}/properties/bso.approval.audit.0001
Tip: External compliance tools can poll the bso-signoff issue property to monitor approval status across issues without needing direct access to the app’s internal storage. The property is standard Jira REST API — any tool that can read Jira issue properties can consume it.
7.6 Common Automation Scenarios
The following scenarios illustrate how to combine the integration points above to solve common approval workflow requirements.
Scenario 1: Simple Peer Review
Goal: Require one teammate to approve before an issue can move to Done.
| Step | Configuration |
|---|---|
| Project setting | Enable Business Sign-off, set threshold to 100% |
| Workflow: “Submit for Review” transition | Post-function: Add Approvers (from project role “Developers”) |
| Workflow: “Submit for Review” transition | Post-function: Notify Approvers (all undecided) |
| Workflow: “Done” transition | Validator: Require Approval Passed |
| Workflow: “Done” transition | Condition: Issue Is Approved (hides transition until approved) |
Scenario 2: Regulatory Change Approval
Goal: Require sign-off from both a technical reviewer and a compliance officer, with full audit trail.
| Step | Configuration |
|---|---|
| Global setting | Enable SoD (assignee + reporter), decision locking, comment required on all decisions |
| Project setting | Eligible approvers: Selected Users, filtered by “Change Approvers” group |
| Workflow: “Submit for Review” transition | Post-function: Add Approvers (from “Technical Reviewers” role) |
| Workflow: “Submit for Review” transition | Post-function: Add Approvers (from “Compliance Officers” group) |
| Workflow: “Submit for Review” transition | Post-function: Notify Approvers (all undecided) |
| Workflow: “Approve for Release” transition | Validator: Require Group/Role Approval (Technical Reviewers: min 1 approved AND Compliance Officers: min 1 approved) |
| Workflow: “Return to Development” transition | Post-function: Reset Approval Status (notify = true) |
Scenario 3: Lightweight Team Acknowledgment
Goal: Have team members acknowledge a decision without blocking the workflow.
| Step | Configuration |
|---|---|
| Project setting | Enable Business Sign-off, Approval Required = Off |
| Project setting | Threshold = 50%, comment required = None |
| Workflow | No validators or conditions needed — approvals are informational only |
| Usage | Team members add themselves as approvers and approve to acknowledge. No workflow gates. |
Scenario 4: Automated Daily Approval Status Report
Goal: Send a daily summary of pending approvals to a project lead.
| Step | Configuration |
|---|---|
| Jira Automation rule | Trigger: Scheduled (daily at 9 AM) |
| Jira Automation rule | JQL condition: "BSO - Status" = "Awaiting Decisions" AND project = PROJ AND updated < -2d |
| Jira Automation rule | Action: Send email to project lead with list of matching issues |
8. Configuring Segregation of Duties
Segregation of Duties (SoD) is a key compliance control that prevents conflicts of interest in approval workflows. Business Sign-off enforces SoD at the API level — violations are prevented, not just flagged.
8.1 How SoD Works
SoD rules prevent specific issue participants from serving as approvers:
- Assignee rule: When enabled, the person assigned to work on the issue cannot approve it. This ensures the person doing the work cannot also sign off on it.
- Reporter rule: When enabled, the person who created the issue cannot approve it. This ensures the requester cannot self-approve.
Real-time enforcement: SoD is not just checked when an approver is added — it is continuously re-evaluated. If the issue’s assignee or reporter changes after approvers have been added, Business Sign-off automatically re-evaluates all existing approvers against the updated SoD rules. An approver who was previously eligible may become ineligible if they are now the assignee or reporter.
Prevention, not flagging: SoD violations are hard-enforced. An ineligible approver cannot record a decision — the app blocks the action and displays the reason. This is stronger than a soft warning that can be overridden.
Visibility in the issue panel: When an approver has a SoD violation, the issue panel displays a warning badge next to their name with a tooltip explaining the reason (e.g., “Cannot approve — user is the issue assignee”). The approver’s decision buttons are disabled.
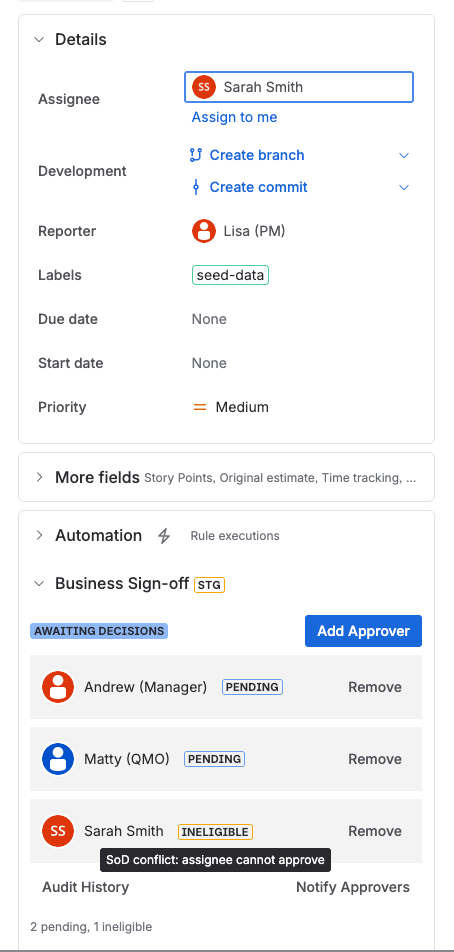
Audit trail: SoD check results are recorded in every audit entry. Each approver action includes a sodResult field with one of three values: PASS (eligible), FAIL (violation detected), or NOT_APPLICABLE (SoD not configured).
8.2 SOC 2 Type II Recommendations
If your organization is pursuing or maintaining SOC 2 Type II compliance, the following configuration provides strong controls for the Change Management and Access Control trust service criteria:
| Setting | Recommended Value | Rationale |
|---|---|---|
| Assignee cannot approve | Enabled (global) | Prevents the person implementing a change from approving it |
| Reporter cannot approve | Enabled (global) | Prevents the requester from self-approving |
| Decision locking | Enabled (global) | Prevents approval withdrawal after issue progresses through workflow |
| Eligible approvers | “Selected Users” filtered by a designated approver role or group | Restricts sign-off authority to authorized personnel |
| Approval threshold | 75% or 100% | Ensures sufficient review coverage |
| Workflow validator | “Require Approval Passed” on production deployment transitions | Blocks deployment without sign-off |
| Audit CSV export | Enabled | Provides evidence for auditor review |
Tip: For production change management, add the Require Approval Passed workflow validator to the transition that moves issues into a “Ready for Deploy” or “Done” status. This guarantees no change reaches production without the required approvals.
8.3 SOX (Sarbanes-Oxley) Recommendations
For organizations subject to Sarbanes-Oxley compliance, Business Sign-off supports the internal controls over financial reporting (ICFR) requirements:
| Setting | Recommended Value | Rationale |
|---|---|---|
| Assignee cannot approve | Enabled (global) | Mandatory separation of execution and approval |
| Reporter cannot approve | Enabled (global) | Prevents self-authorization |
| Decision locking | Enabled (global) | Ensures approvals are immutable once the issue advances |
| Eligible approvers | “Selected Users” filtered by a designated group (e.g., sox-approvers) | Restricts sign-off authority to authorized controllers |
| Approval threshold | 100% (unanimous) | All designated approvers must sign off |
| Workflow validator | “Require Group/Role Approval” with specific department groups configured | Ensures cross-departmental sign-off (e.g., Finance + IT) |
| Audit CSV export | Quarterly exports for compliance reporting | Provides evidence trail for external auditors |
| Comment requirements | “All decisions” | Documents the rationale for every approval and return |
Note: SOX auditors typically require evidence that controls were in place and operating effectively throughout the audit period. Schedule quarterly CSV exports (see Section 10.4) covering the prior quarter and retain them alongside your other compliance artifacts.
8.4 Verifying SoD Enforcement
To verify that SoD rules are working correctly in your environment:
- Navigate to an issue in a project where Business Sign-off is enabled
- Assign yourself as the issue assignee
- In the Business Sign-off panel, attempt to add yourself as an approver
- The app should block the addition and display an error message: “Cannot add approver — user is the issue assignee”
- Check the History in the panel — the failed attempt is recorded with a
FAILSoD result
To verify the reporter rule:
- Create a new issue (you are automatically the reporter)
- Have another user add you as an approver on that issue
- The app should block the addition with a message: “Cannot add approver — user is the issue reporter”
To verify real-time re-evaluation:
- Add User A as an approver on an issue where User A is not the assignee or reporter
- Change the issue’s assignee to User A
- Observe that User A’s row in the panel now shows a SoD violation badge
- User A can no longer record a decision until the assignee is changed to someone else
9. Email Notifications
Business Sign-off sends targeted email notifications to keep approvers and stakeholders informed about approval activity. Notifications are delivered through Jira’s built-in mail system — no external SMTP configuration is needed beyond what Jira Cloud provides out of the box.
9.1 How Notifications Work
- Jira’s notification API: All emails are sent via Jira’s REST API (
/rest/api/3/issue/{key}/notify), which delivers HTML-formatted emails through Jira’s own mail infrastructure. - Rich HTML content: Each notification includes the issue key, issue type, current status, and summary in the email body, along with action-specific context (e.g., who approved, the approval comment, outcome statistics).
- No configuration needed: Because notifications use Jira Cloud’s built-in mail delivery, there is no SMTP server to configure. If your Jira Cloud instance can send email (which it does by default), Business Sign-off notifications will work.
- Fire-and-forget: Notification failures never block approval operations. If an email fails to send (e.g., invalid email address, Jira mail service temporarily unavailable), the approval action completes successfully and the failure is logged silently.
9.2 Notification Types
Business Sign-off sends the following notification types:
| Notification | Trigger | Recipients |
|---|---|---|
| Approver Added | An approver is added to an issue | The added approver |
| Approval Requested | “Notify Approvers” action from the panel or a workflow post-function | All undecided approvers (PENDING status) |
| Re-Review Requested | “Request Re-Review” action (resets all decisions) | All approvers (decisions are reset to PENDING) |
| Decision Made | An approver records an approval or return | Reporter and/or assignee (per project config) |
| Outcome Reached | Approval threshold is met (passed) or approval fails | Reporter and/or assignee (per project config) |
| Approver Removed | An approver is removed from an issue | The removed approver |
Note: The Approval Requested notification is not sent automatically when approvers are added. It is a separate action — either triggered manually from the issue panel (“Notify Approvers” button) or automatically via a Notify Approvers workflow post-function. This two-step design allows you to add all approvers first, then notify them once the issue is ready for review.
9.3 Configuring Notifications
Notification preferences are configured at the project level in Project Settings (see Section 1 for navigation). There are no global notification toggles — all notification types are available by default, and each project controls its own preferences.
The following notification settings are available per project:
| Setting | Options | Default |
|---|---|---|
| Email approver when added | On / Off | On |
| Email reporter on each decision | Approved Only / Returned Only / Approved or Returned / Never | Never |
| Email reporter on outcome | Approved Only / Returned Only / Approved or Returned / Never | Approved or Returned |
| Email assignee on each decision | Approved Only / Returned Only / Approved or Returned / Never | Never |
| Email assignee on outcome | Approved Only / Returned Only / Approved or Returned / Never | Approved or Returned |
Tip: For most teams, the recommended configuration is: Email approver when added = On, Email reporter/assignee on each decision = Never, and Email reporter/assignee on outcome = Approved or Returned. This minimizes notification noise while ensuring stakeholders are informed when the final outcome is reached.
9.4 Notification Rate Limiting
To prevent notification fatigue, Business Sign-off applies rate limiting to the Approval Requested (reminder) notification:
- If an approver has already been notified on the current day (UTC), the reminder notification is skipped for that approver.
- This prevents duplicate notifications when workflow automation or manual actions trigger multiple “Notify Approvers” requests on the same day.
- Rate limiting does not apply to the Re-Review Requested notification, which always notifies all approvers regardless of prior notifications.
- Rate limiting does not apply to the Approver Added notification — each addition sends exactly one email.
10. Audit Trail & Export
Business Sign-off maintains a comprehensive audit trail of all approval activity. Every action — adding an approver, recording a decision, resetting approvals, sending notifications — is recorded with full context for compliance and accountability.
10.1 Viewing Audit History
To view the audit history for an issue:
- Navigate to the issue in Jira
- In the Business Sign-off panel (right sidebar), click the History button
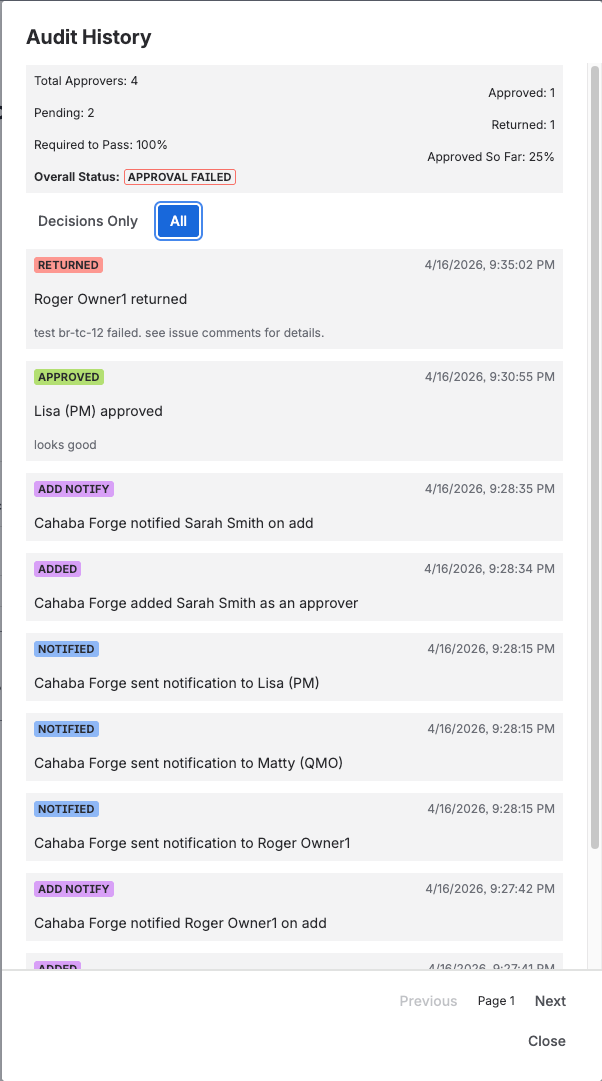
- The history modal displays all approval actions in reverse chronological order (newest first)
Each history entry includes:
| Field | Description |
|---|---|
| Action | The type of action (e.g., Approver Added, Decision Approved, Status Changed) |
| Actor | The user who performed the action |
| Target | The approver affected by the action (if applicable) |
| Timestamp | When the action occurred |
| Comment | The decision comment (for approval/return actions) |
| SoD Result | Whether the SoD check passed, failed, or was not applicable |
| Source | How the action was triggered (UI, Workflow Post-Function, Event Trigger) |
Filtering: Use the filter toggle at the top of the history modal to switch between All History (every action) and Decisions Only (approvals, returns, decision changes, and resets).
Pagination: The history modal loads entries in pages. Scroll to the bottom and click Load More to fetch additional entries for issues with long histories.
10.2 Audit Record Integrity
Every audit record includes a SHA-256 integrity hash computed from the record’s key fields:
- Action type
- Timestamp
- Actor account ID
- Target account ID
- Status transition (from/to)
- Issue context (issue ID, project key)
This hash allows you to verify that records have not been tampered with. To validate integrity:
- Export the audit data to CSV (see Section 10.4)
- For each record, recompute the SHA-256 hash from the same fields
- Compare the computed hash with the
integrityHashcolumn — a mismatch indicates the record was altered
10.3 Immutable Audit Trail (Issue Properties)
For the highest level of compliance assurance, Business Sign-off writes critical approval events to Jira issue properties — native Jira data that persists independently of the app’s storage.
Why issue properties matter:
- Issue properties are native Jira data — they survive app uninstallation, reinstallation, and upgrades
- They provide an independent record that cannot be altered by the app’s own storage layer
- They are accessible via Jira’s REST API, enabling external audit tools to query them directly
How it works:
- Compliance-significant events are written to issue properties with the key format
bso.approval.audit.NNNN(zero-padded sequence numbers starting at0001) - An index property (
bso.approval.audit.index) tracks the current sequence number - Each record includes a hash chain: the record’s integrity hash incorporates the hash of the previous record, creating a tamper-evident chain
Events written to issue properties:
| Event | Description |
|---|---|
DECISION_APPROVED | Approver recorded an approval |
DECISION_RETURNED | Approver returned (rejected) the issue |
DECISION_CHANGED | Approver changed a previous decision |
DECISION_RESET | Approver’s decision was reset |
STATUS_CHANGED | Overall approval status changed |
RE_REVIEW_REQUESTED | All decisions were reset for re-review |
Tip: To inspect issue properties via the Jira REST API, use:GET /rest/api/3/issue/{issueKey}/properties/bso.approval.audit.indexto see the current sequence number, thenGET /rest/api/3/issue/{issueKey}/properties/bso.approval.audit.0001to read individual audit records.
10.4 CSV Export
Business Sign-off provides an audit CSV export feature for delivering compliance evidence to auditors or performing offline analysis.
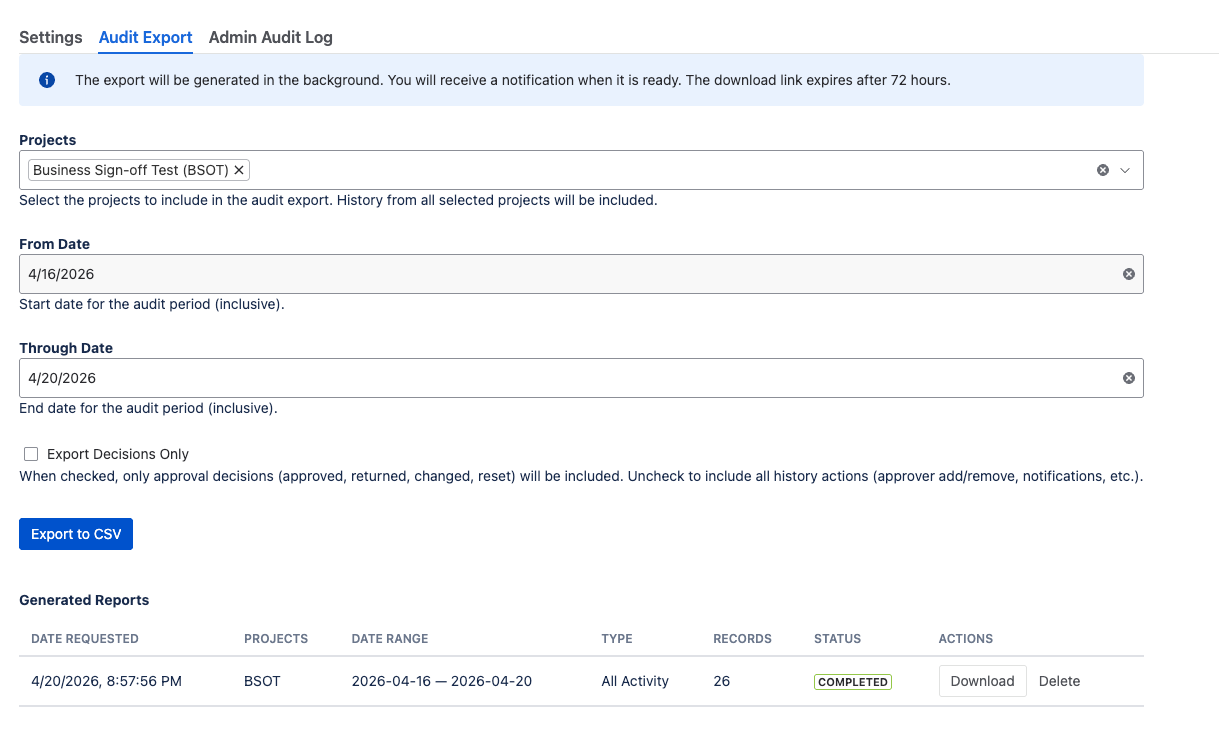
Accessing the export:
- Go to Global Config
- Click the Audit Export tab
Configuring the export:
| Option | Details |
|---|---|
| Projects | Select up to 50 projects to include in the export |
| Date range | Select a start and end date (maximum span: 365 days) |
| Decisions only | When checked, only decision events are included |
Running the export:
- Select the desired projects and date range
- Optionally check Decisions only to filter
- Click Start Export
- A progress indicator shows the export status
- When complete, click Download to save the CSV file
Export limits:
- Maximum 50 projects per export
- Maximum 365-day date range
- Maximum 5 concurrent exports across all administrators
- Completed exports are available for download for 72 hours, then automatically purged
Tip: For recurring compliance reporting, establish a quarterly export schedule. Export the prior quarter’s data within the first week of the new quarter and retain the CSV alongside your other compliance artifacts.
11. Admin Audit Log
The Admin Audit Log records all administrative configuration changes made to Business Sign-off. This provides accountability for who changed what, when, and why.
11.1 Accessing the Admin Audit Log
- Go to Global Config
- Click the Admin Audit tab
Only Jira Administrators can access the Admin Audit Log.
11.2 Audited Actions
| Action | Description |
|---|---|
| Global Configuration Changed | Any change to global settings (with field-level from/to tracking) |
| Project Configuration Changed | Any change to project-level settings |
| Plugin Enabled | The plugin was enabled globally |
| Plugin Disabled | The plugin was disabled globally |
| Export Started | An administrator initiated an audit CSV export |
| Export Downloaded | An administrator downloaded a completed CSV export |
| Diagnostic Logging Toggled | Diagnostic logging was enabled or disabled |
Field-level change tracking: For configuration changes, the audit log captures exactly which fields changed, with from and to values for each field.
11.3 Filtering
The Admin Audit Log supports the following filters:
- Action type: Filter by a specific action type
- Time presets: Last 7 days, 30 days, 90 days, or custom date range
Expandable rows: Click on any audit entry to expand it and view the detailed field changes with field name, old value, and new value.
Admin audit log screenshot will be added in a future update.
11.4 Integrity
Each admin audit entry includes:
- SHA-256 integrity hash computed from the entry’s key fields
- Actor account ID identifying the administrator who made the change
- Timestamp recording when the change occurred
12. Troubleshooting
12.1 Plugin Not Appearing on Issues
- Check global enable: Go to Global Config and verify that the plugin is enabled globally.
- Check project enable: Go to Project Settings for the issue’s project and verify that the project is enabled.
- Check panel visibility: In the project settings, verify the Panel Visibility setting. If set to “Selected Issue Types,” confirm that the current issue’s type is included.
- Check issue type: If panel visibility is set to “All Standard Issue Types,” subtask types are excluded.
- Refresh the page: The issue context panel loads asynchronously. Try refreshing the browser page (Ctrl+Shift+R / Cmd+Shift+R).
Tip: If the panel still does not appear after verifying all settings, try opening the issue in a private/incognito browser window to rule out caching or extension interference.
12.2 Approvers Cannot Be Added
- Check approver management permissions: Verify the Approver Management Permissions section in global settings. Confirm that the current user matches one of the enabled roles (reporter, assignee, or administrator).
- Check issue status category: Approvers cannot be added to issues in the Done status category.
- Check finishing mode: If the project or plugin is in Finishing Mode, new approver additions are blocked.
- Check eligible approver filters: If eligible approvers are set to “Selected Users,” verify the user’s role/group membership.
- Check license status: If the Marketplace license has expired, write operations are blocked.
12.3 Approver Cannot Change Their Decision (Locked)
- Decision locking is enabled and the issue has transitioned since the decision was recorded.
- Only APPROVED decisions are locked. Returned decisions are never locked.
- Return to original status to unlock: Move the issue back to the status it was in when the decision was recorded.
- Workflow reset behavior: The Reset Approval Status post-function skips locked decisions.
- Disable decision locking in global or project config to unlock all decisions immediately.
Note: Decision locking protects downstream workflow stages that rely on earlier sign-offs. Disabling it should be a deliberate decision.
12.4 Approver Cannot Be Removed (Decided)
- Decided approvers are protected from removal by non-admin users.
- Admin override: Only Jira Administrators or Project Administrators can remove decided approvers.
- Check approver management permissions: Verify that the administrator role is enabled in global settings.
- Reset first, then remove: Use Request Re-Review to reset decisions to PENDING, then remove the approver.
12.5 Workflow Validators Not Working
- Verify the validator is on the correct transition in the Jira workflow editor.
- Check that the plugin is enabled for the project.
- For “Require Group/Role Approval”: Verify group/role names and minimum counts in the validator configuration.
- Check approver statuses: Validators require APPROVED status, not just ADDED or PENDING.
12.6 Custom Fields Not Updating
- Sync is best-effort: Custom field synchronization may temporarily lag. The next approval action triggers a re-sync.
- Refresh the issue to trigger a re-render.
- Check that custom fields exist: They are created automatically on first enable. Try disabling and re-enabling the plugin globally if they are missing.
12.7 Email Notifications Not Sending
- Check project notification settings in Project Settings.
- Verify the user’s email address in their Atlassian account profile.
- Notification failures are silent — check diagnostic logs for notification failure entries.
- Check rate limiting: Approvers already notified today (UTC) are skipped for reminder notifications.
12.8 Enabling Diagnostic Logging
- Go to Global Config
- Scroll to the Diagnostic Logging section
- Toggle diagnostic logging On
- Select a duration: 1 hour, 2 hours, 4 hours, or 8 hours
- Click Save
- Reproduce the issue
- Contact support@cahabaforge.com — logs are accessible via the Atlassian Developer Console
- Logging automatically expires after the configured duration
Note: Diagnostic logging increases log output. Always set the shortest duration that allows you to reproduce the issue.
13. Getting Help
If you encounter issues not covered in this guide, or need assistance with configuration, compliance setup, or troubleshooting:
General Support
- Email: support@cahabaforge.com
- Website: https://cahabaforge.com/contact
Security Issues
- Email: security@cahabaforge.com
When contacting support, please include:
- Your Jira Cloud site URL (e.g.,
https://yourcompany.atlassian.net) - The browser and version you are using
- Steps to reproduce the issue
- Screenshots or screen recordings
- The issue key (e.g., PROJ-123) if the issue is specific to a particular Jira issue
- Whether diagnostic logging was enabled (see Section 12.8)
Tip: Enabling diagnostic logging before contacting support significantly speeds up troubleshooting. Enable it, reproduce the issue, then note the time — the support team can correlate your report with the detailed logs.
Refer to the Support Policy for response time commitments and service level details.